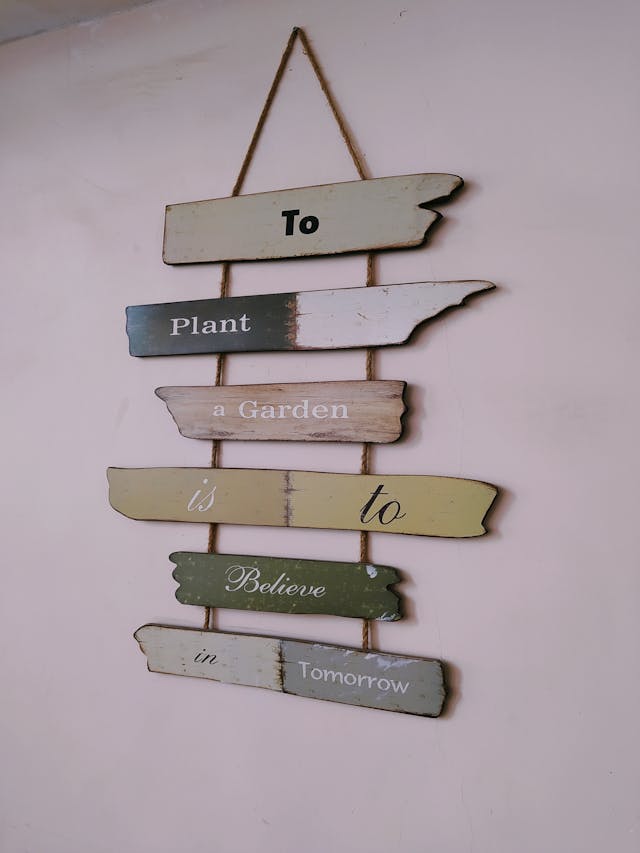
Craft Your Own Distinctive Wall Art Using Recycled Wood Elements
The Beauty of Reclaimed Wood
In recent years, reclaimed wood has become increasingly popular in the realm of home improvement and DIY projects. Its unique textures, diverse color palette, and historical narratives add depth and character to any creation. Crafting wall art using these recycled elements not only fosters sustainability but also imbues your home with a sense of individuality.
Selecting the Right Materials
Your first step in creating distinctive wall art is sourcing the right materials. Reclaimed wood can often be found at construction sites, old barns, or through dedicated suppliers specializing in salvaged wood. When selecting pieces, look for wood that is free from rot and pests, and ensure it's structurally sound.
Considerations for Choosing Wood
- Type of Wood: Different woods have different characteristics. Oak and walnut are dense and durable, ideal for structured designs, whereas pine provides a lighter, more rustic appearance.
- Color and Texture: The patina on older wood can offer rich colors that newer wood lacks. Consider how these will complement your space.
- History: Sometimes the story behind the wood can add personal value to your artwork.
Once you have selected your wood, it’s time to clean and prepare it. Use a wire brush to remove dirt and old finishes, followed by sanding to smooth out rough surfaces while retaining the natural character of the wood.
Designing Your Layout
The next phase involves creating a design that reflects your personal style. Start by sketching ideas on paper. You can opt for abstract patterns, geometric shapes, or even a representational design such as a landscape or cityscape.
Creating a Visual Plan
- Sketch First: Draft several layouts before committing to a final design.
- Play with Dimensions: Incorporate varying lengths and widths of wood to add depth.
- Color Contrast: Use lighter pieces against darker walls or vice versa to make your artwork pop.
Laying out your design on the ground can help you visualize how it will appear when hung. Experiment with different arrangements until you find the one that resonates with you.
Cutting and Assembly
With your layout determined, it’s time to cut and assemble your pieces. Safety is paramount when using power tools. Equip yourself with protective eyewear and ensure your workspace is clean and organized.
Tools Needed
- Circular saw or jigsaw
- Measuring tape
- Sandpaper (various grits)
- Nail gun or wood glue
Cut the pieces according to your design specifications. If your design includes overlapping layers, remember to account for this in your measurements. Once cut, arrange them again in your pre-determined layout.
When satisfied with the layout, begin securing the pieces together. For a seamless look, use wood glue. If you prefer a more industrial style, a nail gun can add visual interest with exposed nails.
Applying Finishes
The finishing touch involves sealing your artwork and potentially enhancing its color. Natural oils like tung or linseed oil can enhance the grain while protecting the wood from future damage. For added color or sheen, consider using water-based stains or polyurethane finishes.
Steps for Finishing
- Sanding: Ensure all surfaces are smooth to the touch.
- Staining: Apply stains with a brush or cloth in even strokes following the wood grain. Wipe away excess after a few minutes to avoid blotchiness.
- Sealing: Apply a coat of finish to protect against moisture and wear. Allow sufficient drying time between coats as recommended by the manufacturer.
This process not only protects your artwork but also enriches its visual appeal by deepening colors and adding luster.
Mounting Your Art
The final step is securely mounting your new art piece on the wall. Depending on its size and weight, you may need specific hardware for proper support. Keyhole hangers or French cleats provide sturdy solutions for heavy pieces.
Installation Checklist
- Locate wall studs for secure anchoring.
- Use a level to ensure your artwork hangs straight.
- If unsure about weight capacity, consult with a hardware specialist.
By following these steps, you'll transform reclaimed wood into a stunning piece of art that not only enhances your living space but also tells a story unique to you.